API Creation & Delivery

The Entire Bulk

In the process, I will guide you on how create and delivery API.

Azure Platform simplies the process chain.

API Management & Control

All the Tools Needed

In the process, I will guide you on how to manage API.

Azure Platform simplies the process chain.

Get in touch

Have a question about these tutorials, or want to suggest a new feature?

Get in touch with me, or drop me a line

Source Control

Step 1 : Creating the Project in the Source Control
Every project need a source Control. The choice of Source Control is subjective to Team / Individual Preferences. I personally use GitHub or BitBucket for most projects. For this tutorial, I will be using Visual Studio Online.

Source Controls:
https://www.visualstudio.com/vso/
https://github.com/
https://bitbucket.org/

Connect To Team Explorer

Step 2 : Connecting to Visual Studio Online
When you sign up with Visual Studio Online, you need to create a Project. In our instance, we will create an API project where the source control versioning will be controlled. The new project will come with master branch, but you can always add additional branches.

Azure API Project

Step 3 : Create a Visual Studio Azure API
Using the Wizard in Visual Studio, create a web application. Then, select Azure Web API. Running Locally to make sure everything works as intended with the default setting. The process is quick and should be very fast.

Launch Local

Step 4 : Running Default Settings Locally
Run the project locally first. Since it is the web project API. It is very important to release that the endpoint are different. The routing configuration point to the Default Routing API:
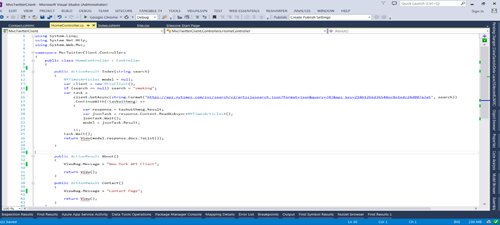
config.Routes.MapHttpRoute( name: "DefaultApi", routeTemplate: "api/{controller}/{id}",defaults:
                        new { id = RouteParameter.Optional } ); 
The correct Url will be :localhost:portnumber/API/Values

Enable Swagger

Step 5 : Enable Swagger
Microsoft has done a tremendous job facilizing our tasks, especially when it comes to documentation and testing. One of the best tool is SWAGGER UI. It will be included in the project, you just have to enabled it. Source:
SwaggerConfig.cs
To access Swagger, run the application and go to: http://localhost:portnumber/swagger/ui/

Build Instance

Step 6 : Committing and Build First Instance
In this step, we will let visual studio online do some work for us. Using your favorite Source Control ; either Visual Studio , Tree Source or other ; Commit your changes. Create a Build Release and Queue it in Visual Studio. Your Project should build correctly.

Azure Portal

Step 7 : Create Azure API App
Create an API Project in Azure. In this process, we will link the azure portal source control to Visual Studio. Hence, the deployment will be automated. We can also control when to automate and how to switch slots, so the server will always be running. I really like this feature of Azure because it speed our process.

API Definition

Step 8 : Create API Definition
API definition lets you configure the location of the Swagger 2.0 metadata describing your API. This makes it easy for others to discover and consume your API. Note: the URL can be a relative or absolute path, but must be publicly accessible. In our case , the url of the API definition will follow this pattern: http://siteazure.net/Swagger/docs/v1

NYTimes API

Step 9 : NYTimes Top Stories API
In our scenario, we will target NYTimes Top Stories API, it is open to the public to an extent. The Top Stories API returns a list of articles and associated images currently on the specified section. Support JSON and JSONP. In addition, it uses Swagger too. Hence, the implementation is fast and compatible. Moreover, they offer console where you can run queries live.

NYTimes Integration

Step 10 : Develop and Integrate NY API
In our scenario, we will target NYTimes Top Stories API, it is open to the public to an extent. The Top Stories API returns a list of articles and associated images currently on the specified section. Support JSON and JSONP. In addition, it uses Swagger too. Hence, the implementation is fast and compatible. Moreover, they offer console where you can run queries live.
In our case studio, we create a NYTimeArticle Model. Through Async Programming, we call the api, get the query and parse them to Json.

Publishing Changes

Step 11 : Publishing Changes
At this stage, we can publish the changes directly or for the best practice, we need to commit changes to source control. When Visual Studio Build it, it will send a notification to azure to get the latest code and voila: It is ready now.


There was a problem with your submission. Please correct the errors and re-submit.
There was a problem submitting the form. Please try again in a minute.
Congratulation, you should have created an API Successfully.
Run Tutorial Again. or Manage API Tutorial or Done

Create API Management

Step 1 : Creating Web API app Management
One of the best milestone of Azure is API Management and I quote Microsoft “Use Azure API Management as a turnkey solution for publishing APIs to external and internal customers.”. It really is amazing. Basically, the entire management with subscription and api call infrastructure is given as simple wizard.
Scaling, Analytics and Identity Integration is at your fingertips. You will get a developer Portal along with a Publisher portal (WOW).
Using Azure, create an API Management application.

API Management Platform

Step 2 : API Management Platform
When the app management is created, you can easily integrate existing API or creating new one from scratch. Since, we did go over the last tutorial on how to set up the API, we would be using that specific API.
Click on Import API and Input the swagger definition URL. Give it a Web API URL Suffix and enable Http and Https Scheme. Azure will automatically give you the URL of the API.

API Console

Step 3 : API Console
The wonder of this tool is that it comes with a console, where you can test all aspects and get real time response. This is major feature in order for you to test all the aspects of the api.

Publisher Portal

Step 4 : Publisher Portal
The publisher portal is the administrative interface where you set up your API program. Use it to:
o Define or import API schema and Package APIs into products.
o Get insights from analytics for the different roles.
o Set up policies like quotas or transformations on the APIs.

Developer Portal

Step 5 : Developer Portal
The developer portal serves as the main web presence for developers, where they can:
o Read API documentation.
o Try out an API via the interactive console.
o Create an account and subscribe to get API keys.
o Access analytics on their own usage.

Build Instance

Step 6 : Analytics
The Analytic Feature helps you understand how much traffic your APIs are getting, what drives that traffic and at what level of performance this is being done. Learn where to look for ideas on improving the APIs that you offer to your developers.

Identity

Step 7 : Identity
Azure App Service offers built-in authentication and authorization services that implement OAuth 2.0 and OpenID Connect.
• It supports five identity providers: Azure Active Directory, Facebook, Google, Twitter, and Microsoft Account.
• It gives you several options for how much authentication work you want to do in your own code.
• It works for both end user and service account authentication.

Subscription

Step 8 : Subscription
The Subscription entity represents the association between a user and a product in API Management. Developers can also subscribe to the product and begin to use the product’s APIs.

Basically, developers can create subscription based with authentication. Azure will take care of creating the entire slack from registering the user, managing the api and creating the keys. One Word : AMAZING.
There was a problem with your submission. Please correct the errors and re-submit.
There was a problem submitting the form. Please try again in a minute.
Congratulation, you should have manage an API Successfully.
Run Tutorial Again. or Get In Touch or Done